Alarm Lock DL2700 User Manual: Comprehensive Guide
Welcome! This comprehensive guide details the Alarm Lock DL2700 Trilogy digital lock, offering secure keyless entry and programmable access for enhanced security solutions․
The Alarm Lock DL2700 is a robust, digitally-controlled access solution designed for commercial and high-traffic applications․ This Trilogy lockset combines the convenience of keyless entry with the security of a traditional keyed lock, offering a versatile access control system․ It’s programmable directly through the keypad, allowing administrators to manage up to 100 unique user codes, enhancing security and tracking access․
Featuring a cylindrical lock mechanism with a standard SC1 keyway, the DL2700 provides a reliable key override for emergency or administrative access․ The lock is ideal for environments requiring controlled access, such as offices, retail spaces, and educational facilities․ Its durable construction and programmable features make it a dependable and adaptable security solution, simplifying access management while bolstering overall security protocols․
Key Features and Benefits
The Alarm Lock DL2700 boasts several key features, including keypad programmability for up to 100 user codes, providing flexible access control․ Its robust cylindrical lock mechanism with an SC1 keyway ensures reliable key override functionality when needed․ The lock’s durable construction guarantees long-lasting performance in high-traffic environments․
Benefits include enhanced security through unique user codes, reduced risk of lost key issues, and simplified access management․ The ability to easily add or delete users streamlines administrative tasks․ The DL2700 offers a cost-effective alternative to traditional key systems, improving security and convenience․ Its programmable features and key override provide a versatile solution for diverse access control needs, making it a valuable asset for any facility․
Package Contents
Upon opening the Alarm Lock DL2700 package, you should find the following components carefully included․ First, the DL2700 lock body itself, comprising the internal locking mechanism and mounting plate․ Secondly, the keypad and lever assembly, which provides the user interface and external handle․ A standard key override cylinder with two keys is also present, offering a backup access method․
Additionally, the package contains all necessary mounting hardware, including screws and strike plates, to facilitate a secure installation․ A detailed user manual, providing step-by-step instructions for installation, programming, and operation, is included for your convenience․ Please verify that all listed items are present before proceeding with the installation process․ If any components are missing, contact the retailer or Alarm Lock support immediately․
Installation Guide
Begin installation by carefully preparing the door and frame, then securely mount the lock body, followed by the keypad and lever assembly for optimal function․
Preparing for Installation
Before commencing the installation of your Alarm Lock DL2700, meticulous preparation is crucial for a seamless and secure setup․ First, verify the door’s compatibility – standard wood or metal doors are generally suitable․ Ensure the door thickness falls within the lock’s specifications, typically between 1 3/8” and 1 3/4”․
Carefully examine the existing hardware․ Remove any existing locksets, including the strike plate, latch, and deadbolt․ Clean the door surface thoroughly to ensure proper adhesion of the new lock components․ Confirm you have all necessary tools readily available: a screwdriver, drill (if needed for pilot holes), and measuring tape․
Review the included diagrams to understand the lock’s orientation and component placement․ Properly identifying the inside and outside of the door is essential for correct installation․ Finally, familiarize yourself with the lock’s parts list to ensure all components are present before proceeding․
Installing the Lock Body
Begin by inserting the lock body into the door’s prepared opening, ensuring the tailpiece aligns correctly with the mortise․ Secure the lock body using the provided mounting screws, tightening them firmly but avoiding over-tightening, which could damage the door or lock․ Verify the lock body sits flush against the door surface and operates smoothly․
Next, install the spindle, connecting it to both the interior and exterior lock mechanisms․ Ensure proper alignment and secure it with the retaining screws․ Test the spindle’s rotation to confirm it engages and disengages the latch freely․
Pay close attention to the orientation of the lock body; incorrect installation can lead to operational issues․ Double-check all connections and screws for tightness before proceeding to the next step․
Installing the Keypad and Lever
Carefully connect the keypad cable to the designated port on the interior lock assembly, ensuring a secure connection․ Align the keypad with the mounting holes and fasten it using the provided screws․ Avoid excessive force to prevent damage to the keypad or lock mechanism․
Next, install the lever handle onto the spindle, securing it with the set screw․ Ensure the lever operates smoothly and returns to its neutral position without obstruction․ Verify proper alignment between the lever, spindle, and lock body․
Thoroughly test the lever’s functionality after installation, confirming it retracts the latch correctly․ Double-check all screws and connections for tightness before proceeding to programming․

Programming the DL2700
Unlock secure access by programming user codes via the keypad, utilizing master code control, and setting temporary codes for convenient, managed entry․
Understanding the Programming Modes
The DL2700 offers several programming modes to customize your lock’s functionality․ Master Code Programming establishes the primary administrative code, crucial for all subsequent settings․ User Code Programming allows for up to 100 unique entry codes, ideal for staff, family, or guests, each with individual access․
Temporary/One-Time Use Codes provide limited-duration access, perfect for service personnel or short-term visitors, enhancing security by automatically deactivating after a single use or specified timeframe․ Accessing these modes typically involves entering a sequence of commands via the keypad, often initiated by the master code․
Understanding these modes is fundamental to effectively managing access control․ Remember to consult the full programming manual (available online) for detailed step-by-step instructions and specific code combinations․ Proper utilization ensures a secure and convenient access system tailored to your needs․
Master Code Programming
The master code is the foundational security element of your DL2700 lock, granting complete control over all programming functions․ If the current master code is forgotten, a reset procedure is required, often involving internal battery disconnection and subsequent reprogramming․ This process erases all existing codes, necessitating a full setup from the factory default master code․
To program a new master code, typically you’ll enter the existing master code, then follow the keypad prompts to input your desired new code․ It’s crucial to choose a code that is not easily guessable and is memorizable for you․
Always safeguard your master code; its compromise jeopardizes the entire system․ Refer to the official programming manual for precise instructions and ensure you document your new master code securely for future reference․
User Code Programming (Up to 100 Codes)
The DL2700 allows for the creation of up to 100 unique user codes, providing individualized access control․ Programming these codes is done through the keypad, typically after entering the master code for authorization․ Each user code can be assigned a specific length, enhancing security․
To add a user code, navigate to the user code programming mode, enter a desired code, and confirm its entry․ The lock will then store this code, granting access to the authorized user․ It’s recommended to assign meaningful codes or track user assignments for easy management․
Regularly review and update user codes, especially when personnel changes occur, to maintain a secure environment․ Detailed instructions are available in the official programming manual;
Temporary/One-Time Use Codes
The Alarm Lock DL2700 offers the convenience of programming temporary or one-time use codes, ideal for visitors, service personnel, or short-term access needs․ These codes can be configured to expire after a single use or after a predetermined timeframe, enhancing security by limiting prolonged access․
To create a temporary code, access the specific programming mode via the keypad, input the desired code, and set its expiration parameters – either a single use or a date/time․ Once the code is used or the expiration date arrives, it becomes inactive․

This feature minimizes the risk associated with permanent code distribution and provides a flexible access control solution․ Refer to the full programming manual for detailed step-by-step instructions․
Operation and Usage
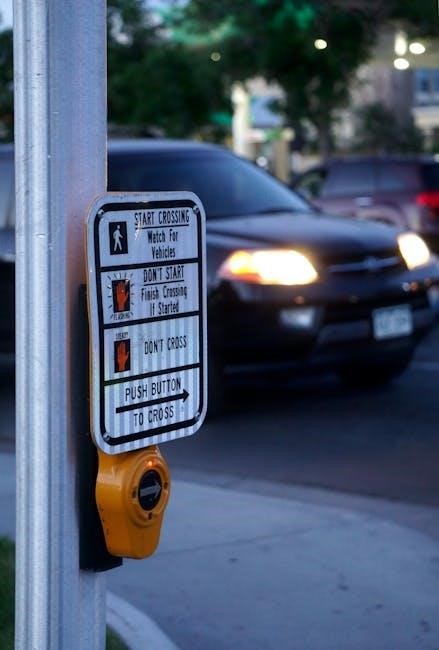
Accessing your property is straightforward with the DL2700: utilize a programmed code on the keypad, or employ the physical key override for convenient entry․
Unlocking the Door with a Code
Entering a valid user code is the primary method for unlocking the DL2700․ Begin by firmly pressing any key on the keypad; this activates the system and illuminates the display․ Subsequently, input your assigned, multi-digit user code․ Ensure each digit is entered deliberately and accurately․
Upon successful code entry, you will hear an audible confirmation – a beep or tone – indicating the lock has recognized your code․ Simultaneously, the lock’s lever or handle will become operable, allowing you to push or pull the door open․
If an incorrect code is entered, the system will provide a visual and/or audible error signal․ The lock will typically enter a lockout period after several consecutive incorrect attempts, enhancing security․ Refer to the troubleshooting section for details on error resolution and lockout procedures․ Remember to keep your code confidential to maintain security․
Unlocking with the Key Override
The DL2700 features a standard key cylinder as a backup unlocking method, providing access even during power failures or programming issues․ Locate the keyway on the lock body – typically situated near the lever․ Insert the provided SC1 key fully into the cylinder․
Apply gentle turning pressure to the key in a clockwise direction․ You should feel a distinct engagement as the lock mechanism disengages․ Simultaneously, the lever or handle will become operable, allowing you to open the door․
It’s crucial to secure the key in a safe and accessible location, separate from the lock itself․ The key override should be used only when necessary, as it bypasses the electronic security features․ Regularly test the key override to ensure functionality․ Remember, maintaining key security is paramount․
Low Battery Warning and Replacement
The DL2700 utilizes batteries to power its electronic functions․ A low battery warning will manifest as a flashing red light on the keypad, indicating imminent battery depletion․ This provides ample time to replace the batteries before complete power loss․ Typically, the lock accepts four AA batteries, housed within the interior portion of the lock․
To access the battery compartment, remove the interior cover plate․ Replace all batteries simultaneously with fresh AA alkaline batteries for optimal performance․ Avoid mixing old and new batteries․
After battery replacement, the lock may require reprogramming․ Ensure proper battery polarity during installation․ Consistent monitoring of the battery indicator will prevent unexpected lockouts․ Expect approximately 12 months of battery life under normal usage․
Troubleshooting
Facing issues? This section provides solutions for common problems like unresponsive locks, incorrect code errors, and key override malfunctions, ensuring smooth operation․
Lock Not Responding
Problem: If your Alarm Lock DL2700 isn’t responding, begin by checking the battery compartment․ Low batteries are a frequent cause of operational failure․ Completely remove the batteries, then press any button on the keypad․ This action effectively resets the lock’s internal memory, clearing any existing codes․
Solution: After the reset, reinstall fresh batteries, ensuring correct polarity․ The lock should now prompt you to reprogram the master code, utilizing the original factory default code (consult separate documentation for this code)․ If the lock still fails to respond, inspect the keypad for any physical damage or debris obstructing the buttons․ A thorough visual inspection can reveal hidden issues․
Further Steps: If problems persist, consider a complete reset by repeating the battery removal and button press sequence․ If none of these steps resolve the issue, professional assistance may be required․
Incorrect Code Error
Problem: Encountering an “Incorrect Code” error indicates the entered code doesn’t match any programmed user or master codes․ Repeated incorrect attempts may temporarily lock the keypad for a security precaution, preventing further access․ This lockout duration varies, typically ranging from several minutes to an hour, depending on the lock’s configuration․
Solution: Double-check the entered code for accuracy, paying close attention to the sequence of numbers․ If you’ve forgotten the master code, a reset procedure is necessary – removing the batteries and pressing any button will erase all codes, requiring reprogramming․ Remember to consult the programming manual for the factory default master code․
Further Steps: If the error persists after verifying the code and resetting, ensure no buttons are stuck or malfunctioning․ If the lockout period expires and the issue remains, professional assistance might be needed to diagnose potential internal problems․
Key Override Malfunction
Problem: A malfunctioning key override means the physical key isn’t operating the lock cylinder smoothly, or not at all․ This could stem from a damaged key, a worn cylinder, or internal mechanical issues within the lock mechanism itself․ Difficulty turning the key, or a key that feels loose, are common indicators․
Solution: First, try a different, known-working key cut for the same lock․ If that functions correctly, the original key is likely the problem and needs replacement․ If the issue persists with multiple keys, the lock cylinder may require professional servicing or replacement․
Further Steps: Avoid forcing the key, as this can worsen the damage․ Lubricating the keyway with a graphite-based lubricant (avoid oil-based products) might temporarily improve function, but a persistent malfunction necessitates a qualified locksmith’s attention․
Advanced Settings
Explore customization! Adjust volume, enable audit trail functionality if available, and reset to factory defaults for optimal performance and security configurations․
Adjusting Volume Settings
Controlling Audible Feedback: The Alarm Lock DL2700 allows you to personalize the volume of its audible feedback․ This includes the beep that confirms successful code entry, low battery warnings, and any error signals․ Adjusting the volume ensures the lock is audible enough for intended users, yet doesn’t cause unnecessary disturbance․
To modify the volume, access the programming mode (refer to the ‘Programming the DL2700’ section for detailed instructions)․ Within the programming menu, locate the volume control option․ Typically, this is presented as a slider or a series of numbered levels․ Use the keypad to navigate and select your desired volume level․ Options may include ‘High’, ‘Medium’, ‘Low’, or a numerical scale․
Experiment with different settings to find the optimal balance between audibility and discretion․ Remember to test the volume after each adjustment to confirm it meets your needs․ A gradually increasing volume option might also be available for alarms․
Audit Trail Functionality (If Applicable)
Tracking Access Events: Certain DL2700 models may feature an audit trail functionality, providing a record of lock activity․ This valuable feature logs events such as successful and unsuccessful code entry attempts, the user code used, and the date and time of each event․ This data is crucial for security monitoring and identifying potential unauthorized access attempts․
Accessing the audit trail typically requires a specific software or a dedicated reader device connected to the lock․ The collected data can then be downloaded and analyzed․ The level of detail recorded within the audit trail can vary depending on the specific DL2700 configuration․
Consult the detailed product specifications or contact Alarm Lock support to confirm if your DL2700 model includes audit trail capabilities and to obtain instructions on accessing and interpreting the logged data․
Resetting to Factory Defaults
Returning to Original Settings: Resetting your Alarm Lock DL2700 to factory defaults erases all programmed codes, including the master code, and restores the lock to its original, out-of-the-box state․ This is useful if you’ve forgotten the master code or are experiencing persistent operational issues․
To perform a factory reset, access the interior battery compartment․ Completely remove all batteries from the lock․ While the batteries are disconnected, press and hold any button on the keypad․ This action initiates the code erasure process․ Reinstall the batteries, and the lock will revert to its factory master code – typically ‘0000’ or ‘1234’ (refer to the original documentation)․
Important: After a reset, you must reprogram the master code and all user codes for continued secure operation․

Maintenance and Care
Preserving Functionality: Regular cleaning with a damp cloth and occasional lubrication will ensure optimal performance and longevity of your Alarm Lock DL2700․
Cleaning the Keypad and Lock
Routine Cleaning is Key: To maintain the appearance and functionality of your Alarm Lock DL2700, regular cleaning is recommended․ Dust, dirt, and fingerprints can accumulate on the keypad and lock surface, potentially affecting responsiveness․ Use a soft, damp cloth – never abrasive cleaners or solvents – to gently wipe down the exterior surfaces․
Avoid excessive moisture; ensure the cloth is only slightly damp to prevent any liquid from entering the lock mechanism․ For stubborn grime, a mild soap solution can be used, but always rinse with a clean, damp cloth afterward․ Pay particular attention to the keypad buttons, ensuring each one is free of debris․
Regular cleaning not only enhances the aesthetic appeal but also contributes to the long-term reliability of your lock․ Inspect the key override cylinder periodically and wipe it clean as well․ This simple maintenance practice will help ensure smooth operation for years to come․
Lubrication Recommendations
Maintaining Smooth Operation: While the Alarm Lock DL2700 is designed for durability, occasional lubrication can ensure continued smooth operation, particularly of the key override cylinder and the lever mechanism․ However, avoid using oil-based lubricants, as these can attract dust and grime, ultimately hindering performance․
Instead, opt for a graphite-based lubricant specifically designed for locks․ Apply a small amount of graphite powder directly into the keyway and gently work the key in and out several times to distribute it․ For the lever, a tiny application of dry silicone spray can help maintain smooth movement․
Be extremely cautious not to over-lubricate, as excess lubricant can cause issues․ Periodic inspection and light lubrication, as needed, will significantly extend the life of your lock and prevent sticking or binding․ Remember, less is more when it comes to lock lubrication․
Battery Life Expectancy
Powering Your Lock: The Alarm Lock DL2700 typically operates on four AA alkaline batteries․ Battery life expectancy is heavily influenced by usage frequency, environmental factors, and battery quality․ Under normal usage – approximately 15-20 code entries per day – you can generally expect the batteries to last between 12 to 18 months․
However, higher traffic or extreme temperatures can reduce battery life․ The lock provides a low battery warning signal well in advance of complete depletion, giving you ample time to replace them․ It’s recommended to use high-quality alkaline batteries for optimal performance and longevity․
Regularly checking the battery status and replacing them proactively will prevent unexpected lockouts․ Consider keeping a fresh set of batteries readily available for quick replacement․

Safety Precautions
Critical Reminders: Always retain key override access, safeguard master codes, and promptly address any lock malfunctions to maintain optimal security and prevent unauthorized entry․
Important Security Considerations
Protecting Your Access: Maintaining the security of your Alarm Lock DL2700 requires diligent attention to several key factors․ Regularly review and update user codes, avoiding easily guessable combinations like birthdays or sequential numbers․ Never share your master code with unauthorized individuals․ The key override should be considered a backup, not a primary access method, and its key should be secured separately․
Be mindful of your surroundings when entering codes, shielding the keypad from potential observers․ If you suspect a code has been compromised, immediately reprogram it․ Consider the implications of granting temporary codes and revoke them promptly after use․ The lock’s audit trail, if enabled, can provide valuable insights into access patterns and potential security breaches․ Remember, physical security of the lock itself is paramount; ensure the door and frame are robust and properly fitted to resist forced entry․
Emergency Access Procedures
Gaining Entry in Critical Situations: In emergency scenarios where authorized access is required but codes are unavailable or forgotten, the key override function provides a crucial alternative․ Locate the keyway and insert the provided key to mechanically unlock the door․ Should the lock become unresponsive – potentially due to a dead battery – the key override remains functional, ensuring access isn’t completely blocked․
If the lock fails to respond even with the key, and you have interior access, removing the batteries and pressing any button will initiate a reset, erasing all codes․ This allows for reprogramming with the factory master code․ However, this should be a last resort; Always document any emergency access events and reprogram codes immediately afterward to maintain security․ Prior planning and familiarization with these procedures are vital․
Warranty Information
Limited Warranty Coverage: Alarm Lock provides a limited warranty against defects in materials and workmanship for a period of one (1) year from the date of purchase on the DL2700 lock․ This warranty covers repair or replacement of the lock, at Alarm Lock’s discretion, and does not cover damage resulting from misuse, abuse, vandalism, improper installation, or unauthorized modifications․
To make a warranty claim, contact Alarm Lock customer support with proof of purchase and a detailed description of the defect․ Shipping costs to and from the repair facility are the responsibility of the purchaser․ This warranty is non-transferable and applies only to the original purchaser․ Any implied warranties are limited to the duration of this express warranty․ See Alarm Lock’s full warranty policy for complete details and exclusions․